Page 20 of 26
Re: From FreeCAD To The Real World
Posted: Thu May 05, 2022 12:41 am
by paullee
3D printing looks great

Just wondering what is the purpose of the component in a window.
Re: From FreeCAD To The Real World
Posted: Thu May 05, 2022 1:02 am
by ragohix769
paullee wrote: ↑Thu May 05, 2022 12:41 am
3D printing looks great
Just wondering what is the purpose of the component in a window.

It's to block the external darkening shutter (not the windows, the external, in Italy it's named "Persiana"). The original it's iron, but I've created the same, with a better shape and pretty solid (100% infill of course), in very basic PLA
This was my first time ever using Part Design, very cool and fun!
Re: From FreeCAD To The Real World
Posted: Thu May 05, 2022 4:12 pm
by paullee
I see, thanks
Re: From FreeCAD To The Real World
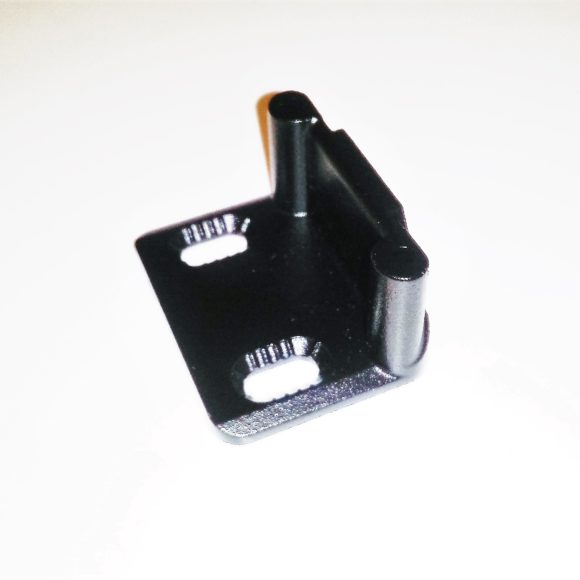
Posted: Fri May 06, 2022 7:29 am
by JaffH
ragohix769 wrote: ↑Wed May 04, 2022 3:57 pm
My real world stuff made with our loved FreeCAD:
Iron block system for my darkening shutter (outside the window) is broken. Easy redraw from scratch in Part Design with @FreeCADNews
and then printed. Thanks #FreeCad #opensource #community #foss
Looks good. I was just looking for something similar for my back door. What to print it on my
Creality Ender 3. The model looks pretty simple.
Re: From FreeCAD To The Real World
Posted: Fri May 06, 2022 2:32 pm
by ragohix769
JaffH wrote: ↑Fri May 06, 2022 7:29 am
ragohix769 wrote: ↑Wed May 04, 2022 3:57 pm
My real world stuff made with our loved FreeCAD:
Iron block system for my darkening shutter (outside the window) is broken. Easy redraw from scratch in Part Design with @FreeCADNews
and then printed. Thanks #FreeCad #opensource #community #foss
Looks good. I was just looking for something similar for my back door. What to print it on my
Creality Ender 3. The model looks pretty simple.
Here you have my project file, if you want to modify it, very very simple Part Design job
Re: From FreeCAD To The Real World
Posted: Fri May 06, 2022 4:11 pm
by chrisb
Great project: modeled, printed, done.
Some comments:
- I would have made all sketches fully constrained, because I usually have to readjust things after a first prototype.
- Choosing the origin so that you can benefit from symmetry, even modeling only half and doing a mirror is possible.
- Using the Hole feature saves one feature/dressup and makes you less dependent on topology.
- The simple copy seems superflous to me.
Re: From FreeCAD To The Real World
Posted: Fri May 06, 2022 4:54 pm
by Shalmeneser
Re: From FreeCAD To The Real World
Posted: Fri May 06, 2022 9:28 pm
by ragohix769
chrisb wrote: ↑Fri May 06, 2022 4:11 pm
Great project: modeled, printed, done.
Thanks Chris
Some comments:
1 I would have made all sketches fully constrained, because I usually have to readjust things after a first prototype.
2 Choosing the origin so that you can benefit from symmetry, even modeling only half and doing a mirror is possible.
3 Using the Hole feature saves one feature/dressup and makes you less dependent on topology.
4 The simple copy seems superflous to me.
1) That's right. It was fully constrained for the 3/4 of the time, but at the end I made some (big) modification from scratch, so the final body and sketches were not so clean.
2) Mirroring was the first choice but I was not so capable (now I am
), I made a lot of other models design to finish this little micro project. In the beginning I used Part creating only boolean edit, it was very difficult. I never used Part Design logic, so this was my first time, it was fun, but I had problem understanding part design flow process, and that part it's not so compatibile with part design feature design. I can say that this micro-project was very useful to understand
3) I've seen this, because when I made some modification, a lot messed up quickly becuase this wasn't created with discipline. So when I was sure about measures, I quickly recreated all from scratch (we can say "rought").
4) simple copy was to experiment with rendering in mesh and to export, i've not saved that.
Thanks a lot for your suggestions
Re: From FreeCAD To The Real World
Posted: Sat May 07, 2022 1:03 pm
by ragohix769
Updated this microproject with mirror feature and fully constrained sketches
Thanks a lot to all for advices and suggestions

Re: From FreeCAD To The Real World
Posted: Tue May 31, 2022 6:23 pm
by ngocminhdao88
I just grinded a 120 grad spotting drill, using FreeCAD as help tool to figure out the angle needed to set on the grinder. Wonky geometry, but the drill bit works